Thrift it, Repurpose It, Remake it
and Wear it!
Today's Sew Chic Upcycling post is from my AMAZING co-host: Sarah from This Crazy, Blessed Life Her blog has so much to share! She shares weekly menus, couponing ideas, sewing and crafting tutorials and recipes. You have to check it out!
Sarah and I have become quick blogging friends over past few months. She tried out one of my patterns and fell in love with it's simplicity. You can find it here: The Laurie Claire Tunic for Women. She has such a sweet and creative spirit and I was so excited when she asked me to co-host this Sew Chic Upcycling Event with her. What started as a small idea to have a week's worth of guest posters turned into 2 weeks of guest posters, a linky party and prizes! I'm so glad I met her!
And wait until you see what she makes for you today!
Take it away, Sarah!

It's hard to tell here, but these bad boys ride up about 4 inches when she sits down. And yep, we didn't realize that until we were out somewhere this Spring. I'm sure people thought, "Buy that girl some clothes that fit!" Oh well...
I wanted a 1/2 inch hem, so I added 1 inch to the mark that I made. You could totally use a fabric pen or something else to mark them, but I just measured and pinned all the way around to give me my cutting lines.
Now, chop those suckers off! And keep your scraps! You never know when you'll need to make a denim rosette. Am I right?

Now, turn them inside out and iron the cuff over 1/4 to 1/2 inch. Then turn the cuff over another 1/2 inch and iron.

These are adorable as is. But we all know that adding ruffles makes anything even cuter!
To create your ruffle, cut a strip of fabric 1.5 to 2 times as long as you would need to go around the leg. Does that make sense? This is not an exact science. If your strip is shorter, your ruffle is less ruffly. And if it's longer, it's more ruffly.
Now, zig zag stitch the edges of the ruffle to prevent fraying. Then, with your sewing machine on straight stitch, make your stitches as long as your machine goes and stitch up the middle. Make sure not to back stitch at all!
Your strip will look like this.

Now holding the back thread, pull the fabric up and make your fabric gather. Pin to your shorts and sew it on.
{Make sure to change your stitch length back. I always forget this step!}

I hope you find her modeling pictures as humorous as I did. I took like 25 pictures and this was all I got. The others had arms all funky and her eyes closed {purposely, mind you}.
Here's what I love about this project:
1) Your shorts are the perfect length! They aren't daisy dukes. And they aren't Bermuda shorts either. This is my hardest thing when shopping for shorts for me and Layne!
2) Match your ruffle to a top and you've got a custom outfit! I made a simple Minnie Mouse Applique tee using the same fabric and now we've got a custom outfit for our Disney Trip in September!
{And I've already planned what day she will wear this. And what they will wear every other day. I'm just a little excited about our trip! Can you tell?!?}
Thanks for sticking it out if you made it this far! And come visit me sometime! I love new Bloggy Friends!
Now it's YOUR TURN!Link up your original upcycled or recycled fashions from August 1-12th for a chance to WIN PRIZES!
Winners will be announced August 12th. Check out our AMAZING SPONSORS below!
Today's Sew Chic Upcycling post is from my AMAZING co-host: Sarah from This Crazy, Blessed Life Her blog has so much to share! She shares weekly menus, couponing ideas, sewing and crafting tutorials and recipes. You have to check it out!
Sarah and I have become quick blogging friends over past few months. She tried out one of my patterns and fell in love with it's simplicity. You can find it here: The Laurie Claire Tunic for Women. She has such a sweet and creative spirit and I was so excited when she asked me to co-host this Sew Chic Upcycling Event with her. What started as a small idea to have a week's worth of guest posters turned into 2 weeks of guest posters, a linky party and prizes! I'm so glad I met her!
And wait until you see what she makes for you today!
Take it away, Sarah!
Hey everyone! I'm Sarah from This Crazy Blessed Life. This is where I share recipes, crafts and tutorials, my adventures in sewing, and life as a mom.

I'm so excited to be hosting this awesome event with Jenny. It's so funny how things work and how this event was brought to life. I think Jenny and I have emailed back and forth about 50 times and this event has exceeded our expectations! Thank YOU for reading our guest posts and participating in the UPCYCLING linky party!
Okay, now on to my creation! I wanted to create something that was easily duplicated. That was practical. And easy.
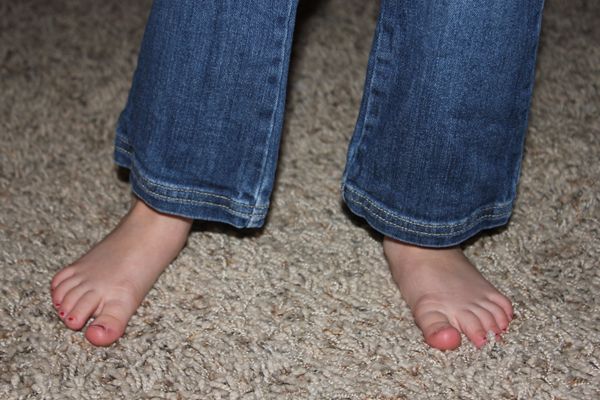
My daughter is a skinny minny. She has no problem fitting into pants or shorts that she wore two years ago. We'd never have to buy clothes if it weren't for her getting taller, LOL! She's 4 in two weeks and these jeans 2Ts! For this project, I grabbed a pair of too short pants.
It's hard to tell here, but these bad boys ride up about 4 inches when she sits down. And yep, we didn't realize that until we were out somewhere this Spring. I'm sure people thought, "Buy that girl some clothes that fit!" Oh well...
While wearing them, I marked the desired length with a straight pin. Then had her take them off carefully :)
I wanted a 1/2 inch hem, so I added 1 inch to the mark that I made. You could totally use a fabric pen or something else to mark them, but I just measured and pinned all the way around to give me my cutting lines.
Now, chop those suckers off! And keep your scraps! You never know when you'll need to make a denim rosette. Am I right?


Now sew!
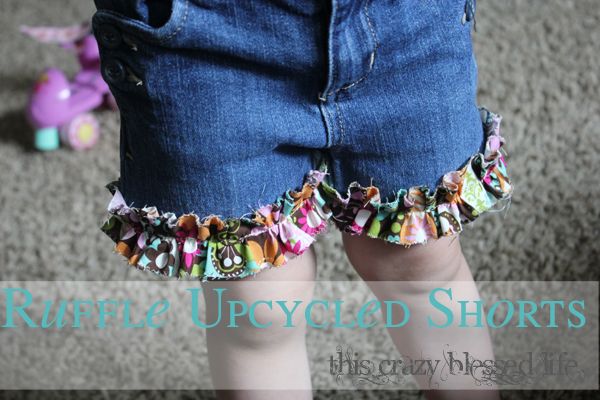
These are adorable as is. But we all know that adding ruffles makes anything even cuter!
To create your ruffle, cut a strip of fabric 1.5 to 2 times as long as you would need to go around the leg. Does that make sense? This is not an exact science. If your strip is shorter, your ruffle is less ruffly. And if it's longer, it's more ruffly.
Now, zig zag stitch the edges of the ruffle to prevent fraying. Then, with your sewing machine on straight stitch, make your stitches as long as your machine goes and stitch up the middle. Make sure not to back stitch at all!
Your strip will look like this.

Now holding the back thread, pull the fabric up and make your fabric gather. Pin to your shorts and sew it on.
{Make sure to change your stitch length back. I always forget this step!}

I hope you find her modeling pictures as humorous as I did. I took like 25 pictures and this was all I got. The others had arms all funky and her eyes closed {purposely, mind you}.
Here's what I love about this project:
1) Your shorts are the perfect length! They aren't daisy dukes. And they aren't Bermuda shorts either. This is my hardest thing when shopping for shorts for me and Layne!
2) Match your ruffle to a top and you've got a custom outfit! I made a simple Minnie Mouse Applique tee using the same fabric and now we've got a custom outfit for our Disney Trip in September!
{And I've already planned what day she will wear this. And what they will wear every other day. I'm just a little excited about our trip! Can you tell?!?}
Thanks for sticking it out if you made it this far! And come visit me sometime! I love new Bloggy Friends!
Now it's YOUR TURN!Link up your original upcycled or recycled fashions from August 1-12th for a chance to WIN PRIZES!
Winners will be announced August 12th. Check out our AMAZING SPONSORS below!
LINKY RULES:
1. Link a CLOTHING project you upcycled or recycled.
2. Add this button to your blog or post so more people can join the fun!
3. Follow Seamingly Smitten and This Crazy, Blessed Life
And add this button to your post!
<a href="http://thiscrazyblessedlife.blogspot.com/" target="_blank"><img alt="Photobucket" border="0" src="http://i1137.photobucket.com/albums/n504/Rah1515/RefashionWeekcopy.jpg" /></a>
Go ahead, show us what ya got!
A HUGE Thank you to our SPONSORS:
Check back tomorrow for more upcycled projects!








2 comments:
Yay!! This week has exceeded my expectations! And we already have 27 links!!! Woo Hoo!!
So cute, Sarah! I have a skinny minnie myself and I'm feeling you on the growing too tall for all of her jeans before she grows out of them!! I'll have to make her some new shorts.
Post a Comment