Friday, July 19, 2019

Callie Wrap Dress Sew Along Day 5 - Seamingly Smitten

Callie Wrap Dress sewing pattern Sew Along Day 

Day 5 - Hemming the armholes OR adding armbands, hemming the skirt, finishing your dress!

Watch our VIDEO HERE and subscribe to our channel for new videos and sew alongs!


I am so excited about our Callie Wrap Dress sewing pattern SEW ALONG! Thank you so much to our fabulous sponsor, Evelyn Lee, of Seweird Fabrics!! She has so graciously sponsored the sew along and is giving away one $25 store credit to her shop! $25 of fabric!! Yes, please!! Go ahead and check out her fabrics to plan out all the beauties you would get if you win!!


Each day we will do a few steps and by Friday you will have a finished dress to wear out next weekend! Can you believe it? Yes!! It's that simple! Instead of worrying about finding all the time to print, cut fabric, sew, hem...we are going to split up all that work so you can do this in just 20 minutes a day!

Here's the plan:

Monday: Print your pattern, assemble pattern, cut your size  (Blog HERE and Video HERE)
Tuesday: Cut out your fabric (Blog HERE / Video HERE)
Wednesday: Sew shoulders, band or hem neckline, attach sleeves if adding them, sew side seams (Blog HERE / Video HERE)
Thursday: finish up bodice if needed, then attach the circle skirt (Blog HERE or Video HERE)
Friday: hem sleeves and circle skirt and you're done!! (Video HERE)


Day 5

1. Hem the armholes by folding under a 1/2 inch hem. Sew with a 3/8 inch seam allowance. 
OR 
Cut sleeve bands to attach to your sleeves. Measure each armhole, multiply by .8 then add 1/2 inch. That is the measurement you need. Cut TWO strips 2 inches tall by that width.
Fold each strip right sides together and sew along the short 2 inch side. Now it is a loop.
Fold each in half with wrong sides together, making each a 1 inch tall loop. 
Pin the raw edges of the armhole band to the dress' armhole. Sew. Flip and press with an iron. 

2. Hem the circle skirt by folding up 1/2 an inch, then sew using a 3/8 inch seam allowance. 
3. Pres well. 

You're done!!
Try it on and come share a picture in our facebook group!! We have 2 giveaways going on!! Come check it out and enter to win!

Thursday, July 18, 2019

Callie Wrap Dress sewing pattern Sew Along Day 4

Callie Wrap Dress sewing pattern Sew Along Day 

Day 4 - Attaching the circle skirt to the bodice

Watch our VIDEO HERE and subscribe to our channel for new videos and sew alongs!


I am so excited about our Callie Wrap Dress sewing pattern SEW ALONG! Thank you so much to our fabulous sponsor, Evelyn Lee, of Seweird Fabrics!! She has so graciously sponsored the sew along and is giving away one $25 store credit to her shop! $25 of fabric!! Yes, please!! Go ahead and check out her fabrics to plan out all the beauties you would get if you win!!


Each day we will do a few steps and by Friday you will have a finished dress to wear out next weekend! Can you believe it? Yes!! It's that simple! Instead of worrying about finding all the time to print, cut fabric, sew, hem...we are going to split up all that work so you can do this in just 20 minutes a day!

Here's the plan:

Monday: Print your pattern, assemble pattern, cut your size  (Blog HERE and Video HERE)
Tuesday: Cut out your fabric (Blog HERE / Video HERE)
Wednesday: Sew shoulders, band or hem neckline, attach sleeves if adding them, sew side seams (Blog HERE / Video HERE)
Thursday: finish up bodice if needed, then attach the circle skirt
Friday: hem sleeves and circle skirt and you're done!!


Day 4


1. Find the center front, back and sides of your bodice and place a pin at each of these spots. Do the same for your skirt. 
2. Turn your bodice right side up. Turn your skirt inside out and upside down. 
3. Insert the bodice into the skirt, matching the bottom edge of the bodice to the skirt's waist. Match up the pins evenly to pin the skirt evenly around the bodice.
4. Sew around your bodice using a 3/8 inch seam allowance. 
5. To add elastic at the waist: wrap a piece of 3/8 inch elastic around your waist snugly. Trim to that length. Overlap the edges 1/4 inch and zig-zag the ends to secure in a loop.
6. Quarter the elastic loop into 4 equal sections and place a pin at each place. Repeat for the seam of the bodice/skirt waist where you attached them.
7. Match up the pins of the elastic to the pins of the skirt and pin the elastic loop to the seam allowance of the bodice/skirt waist. 
8. Sew around the seam allowance / on top of the elastic to attach the elastic.

Turn right side out and check your work! Try it on and see how it fits! 

See you back here tomorrow for hemming the sleeves and the circle skirt. If you left it sleeveless you can hem the armhole or band the sleeves. 


Wednesday, July 17, 2019

Callie Wrap Dress pattern Sew Along Day 3

Callie Wrap Dress sewing pattern Sew Along Day 

Day 3 - Assembling the bodice of the wrap dress
(attaching sleeves, neckband and sewing side seams)

Watch our VIDEO HERE and subscribe to our channel for new videos and sew alongs!


I am so excited about our Callie Wrap Dress sewing pattern SEW ALONG! Thank you so much to our fabulous sponsor, Evelyn Lee, of Seweird Fabrics!! She has so graciously sponsored the sew along and is giving away one $25 store credit to her shop! $25 of fabric!! Yes, please!! Go ahead and check out her fabrics to plan out all the beauties you would get if you win!!
Want to join the sew along?


Each day we will do a few steps and by Friday you will have a finished dress to wear out next weekend! Can you believe it? Yes!! It's that simple! Instead of worrying about finding all the time to print, cut fabric, sew, hem...we are going to split up all that work so you can do this in just 20 minutes a day!

Here's the plan:

Monday: Print your pattern, assemble pattern, cut your size  (Blog HERE and Video HERE)
Tuesday: Cut out your fabric (Blog HERE / Video HERE)
Wednesday: Sew shoulders, band or hem neckline, attach sleeves if adding them, sew side seams (Blog HERE and Video HERE)
Thursday: finish up bodice if needed, then attach the circle skirt (Blog HERE and Video HERE)
Friday: hem sleeves and circle skirt and you're done!!

Day 3

1. Lay your back bodice right sides up. 
2. Lay your front bodices right sides together on your back bodice, matching the bottom edges, side edges and shoulders. If you are adding sleeves pin along the shoulder edges only. If you are NOT adding sleeves, pin along the shoulder and side seams. Sew.
3. Find the center of each sleeve, pin center of sleeve to the shoulder seam with right sides together. Continue pinning each sleeve along the armhole, pin, then sew.
4. Iron your neckband in half with WRONG sides together. Spread out the neckline and lay the neckband right sides together along your neckline, with raw edges matching. Pin. Sew.
5. Press neckband with an iron and press seam allowances under. Topstitch using a 1/8 inch seam allowance. Press again with iron.
6. Lay bodice right sides together. Pin from your sleeve's edge down the side edges. Sew.
7. You are done for today!


Tuesday, July 16, 2019

Callie Wrap Dress sewing pattern SEW ALONG DAY 2

Callie Wrap Dress sewing pattern Sew Along Day 2

Day 2 - Cutting out your fabric pattern pieces

Watch our VIDEO HERE and subscribe to our channel for new videos and sew alongs!


I am so excited about our Callie Wrap Dress sewing pattern SEW ALONG! Thank you so much to our fabulous sponsor, Evelyn Lee, of Seweird Fabrics!! She has so graciously sponsored the sew along and is giving away one $25 store credit to her shop! $25 of fabric!! Yes, please!! Go ahead and check out her fabrics to plan out all the beauties you would get if you win!!

Want to join the sew along?

Each day we will do a few steps and by Friday you will have a finished dress to wear out next weekend! Can you believe it? Yes!! It's that simple! Instead of worrying about finding all the time to print, cut fabric, sew, hem...we are going to split up all that work so you can do this in just 20 minutes a day!

Here's the plan:

Monday: Print your pattern, assemble pattern, cut your size  (Blog and Video HERE)
Tuesday: Cut out your fabric 
Wednesday: Sew shoulders, band or hem neckline, attach sleeves if adding them, sew side seams
Thursday: finish up bodice if needed, then attach the circle skirt
Friday: hem sleeves and circle skirt and you're done!!

Post a finished picture to our fb group by Wednesday, 7/24 to be entered to WIN a $25 store credit to Seweird Fabrics from Evelyn Lee (one winner) and 3 free Seamingly Smitten sewing patterns (3 winners)! I cannot see what you all make!

Day 2

Watch the video HERE or follow along in the pattern to cut out your pattern pieces.

1. Cut out two front bodices / one is in mirror image.
2. Cut out one back bodice.
3. Cut out your sleeves (if using them).
4. Cut out your circle skirt.
5. Cut out your neckband (if using).


Monday, July 15, 2019

Callie Wrap Dress sewing pattern SEW ALONG DAY 1

Callie Wrap Dress sewing pattern Sew Along 

DAY 1
Printing, Assembling and Cutting the paper pattern pieces

You can watch a video OR you can follow along with the directions below (KEEP SCROLLING)

Grab your Callie Wrap Dress Sewing Pattern HERE.


I am so excited about our Callie Wrap Dress sewing pattern SEW ALONG! Thank you so much to our fabulous sponsor, Evelyn Lee, of Seweird Fabrics!! She has so graciously sponsored the sew along and is giving away one $25 store credit to her shop! $25 of fabric!! Yes, please!! Go ahead and check out her fabrics to plan out all the beauties you would get if you win!!

Want to join the sew along?

Each day we will do a few steps and by Friday you will have a finished dress to wear out next weekend! Can you believe it? Yes!! It's that simple! Instead of worrying about finding all the time to print, cut fabric, sew, hem...we are going to split up all that work so you can do this in just 20 minutes a day!

Here's the plan:

Monday: Print your pattern, assemble pattern, cut your size
Tuesday: Cut out your fabric 
Wednesday: Sew shoulders, band or hem neckline, attach sleeves if adding them, sew side seams
Thursday: finish up bodice if needed, then attach the circle skirt
Friday: hem sleeves and circle skirt and you're done!!

Post a finished picture to our fb group by Wednesday, 7/24 to be entered to WIN a $25 store credit to Seweird Fabrics from Evelyn Lee (one winner) and 3 free Seamingly Smitten sewing patterns (3 winners)! I cannot see what you all make!


DAY 1

1. Printing your pattern - When you print, make sure your printer is set to Page Scaling NONE or Print at 100%. Make sure your 1 inch square or 5cm square measures correctly.
**A0 Copy Shop Printing: If you are printing in A0 format, print the last page of this pattern on a large format printer. No taping required. 

I included a printing chart on page 5 of the Callie Wrap Dress pattern directions. If you want to save paper, you can print only the pieces you will be using. For example, I am only using the front bodice, back bodice and short sleeve pattern pieces. I am not printing the circle skirt because I am going to cut mine using measurements.

Print the pieces you need.

Assembling your pattern - I like to make a stack of one row at a time (4 pages) and trim along the bottom and right side of each page. Then I lay out the pages horizontally and match up the diamond shapes along the page borders until I have my top row completed and tape. I always tape at the cutting lines of my size, so as I cut out, it will stick together.


2. Choosing your size. For the Callie Wrap Dress pattern I chose my size based on my bust size. Look at the size chart on page 2 to find your size. 

Also, if you typically wear PETITE in stores, you will want to cut on the petite cutting line. This brings in the width by 1 inch on the front and 1 inch on the back. That will bring in the neckline width for the back which will keep it from being too wide on your shoulders. If you are PETITE don't you notice a difference when you wear a PETITE cut shirt from a store vs the same shirt in the REGULAR? That is because of this width difference and also the hem difference. 


3. Choosing your length: Measure from the top of your shoulder down to where you want your bodice to hit. Add 1 inch to this to account for the seam allowance on the shoulder and when you add the circle skirt. Take that measurement and measure from the top shoulder down to the bodice hem and make a mark. Trim to that length or use the length lines already made for you. 

4. Determining sleeve length:  Measure from the top of your shoulder down to where you want your sleeve to hit. Add one inch to this to account for hem and seam allowance. Trim there if you are using the sleeve pattern pieces. To measure LONG sleeve length, measure from the top of your arm to 1 inch below your wrist while your arm is slightly bent. I get 23 inches and then I add 1 inch to get a sleeve length of 24 inches. Some of you may want to add extra length if you like to tuck your hands into your sleeves when you are chilly!  

Cut out your paper pattern pieces and you are done for the day!


Saturday, July 13, 2019

Choosing Fabric for The Callie Wrap Dress sewing pattern SEW ALONG

Callie Wrap Dress sewing pattern Sew Along


I am so excited about our Callie Wrap Dress sewing pattern SEW ALONG that starts on Monday! Thank you so much to our fabulous sponsor, Evelyn Lee, of Seweird Fabrics!! She has so graciously sponsored the sew along and is giving away one $25 store credit to her shop! $25 of fabric!! Yes, please!! Go ahead and check out her fabrics to plan out all the beauties you would get if you win!!

Want to join the sew along?


Each day we will do a few steps and by Friday you will have a finished dress to wear out next weekend! Can you believe it? Yes!! It's that simple! Instead of worrying about finding all the time to print, cut fabric, sew, hem...we are going to split up all that work so you can do this in just 20 minutes a day! 


Here's the plan:

Monday: Print your pattern, assemble pattern, cut your size
Tuesday: Cut out your fabric 
Wednesday: Sew shoulders, band or hem neckline, attach sleeves if adding them, sew side seams
Thursday: finish up bodice if needed, then attach the circle skirt
Friday: hem sleeves and circle skirt and you're done!!

Post a finished picture to our fb group by Wednesday, 7/24 to be entered to WIN a $25 store credit to Seweird Fabrics from Evelyn Lee (one winner) and 3 free Seamingly Smitten sewing patterns (3 winners)! I cannot see what you all make!

CHOOSING FABRIC for your Callie Wrap Dress

Let's talk fabric choices! For the Callie Wrap Dress pattern you want to choose a soft knit with great drape such as double brushed poly, silk jersey, bamboo jersey, rayon jersey, poly/lycra blend, cotton/spandex/bamboo/lycra blend, ITY knit or similar. 

Seweird Fabrics has double brushed poly HERE, ITY knit HERE, rayon spandex HERE 
or all fabrics HERE.

Evelyn sent me this beautiful DTY (not brushed) poly/lycra fabric that is super soft and has the most perfect stretch for this dress! You can find it HERE


My other favorite that she sent me was this poly/lycra that has the same stretch as the one above and the listing picture just sold it to me!

I hope you have fun shopping for your fabrics and meet me back here Monday to print, tape and cutout your paper pattern pieces in your size! A few steps a day and you are on your way!

Women's Wrap Dress sewing pattern / women's wrap dress PDF sewing pattern

Callie Wrap Dress pdf sewing pattern by Seamingly Smitten
NEW Release!


I am thrilled to introduce to you our newest sewing pattern, The Callie Wrap Dress! This wrap dress has been in my sketchbook for a few months now! I love a great wrap dress! They are flowy and twirly and I just feel so dressed up when I wear them! Instead of a true wrap with a belt, I decided to make a mock wrap dress bodice with a circle skirt. I also added sleeves as an option so The Callie Wrap Dress can be worn throughout all seasons! You can make your wrap dress sleeveless, have short sleeves, 3/4 length sleeves and long sleeves OR you can even add flutter sleeves for a whole different look!

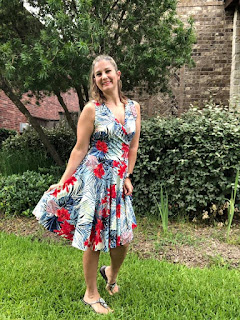
Here is mine in a cotton/lycra 

Here's another with flutter sleeves that I wore to Mykenos, Greece for a family trip. I loved how the flutter sleeves gave it a flouncy look!

Check out these fabulous dresses from our pattern testers! Every single one of them made beautiful dresses that they were so proud to show off to our group!! Some ladies made them sleeveless, some made them with flutter sleeves, some made them with a banded neckline while others simply hemmed. Either way, this dress has style, chicness and is ready to be sewn by you!

To see all of our pattern tester photos, check them out in the listing photos www.seaminglysmitten.com