Monday, June 24, 2013

TUTORIAL: How to sew a High to Low Maxi Dress

 
How to sew a High-Low Maxi Dress
 

 If you've been shopping lately you have seen the high-low dress trend everywhere! It just so happened last week a sweet customer, Doray B., wrote to me asking if I could do a tutorial on how to turn The Bardot Dress sewing pattern - CLICK HERE into a high-low Maxi Dress! She said she loved the style of the Bardot dress pattern, the pockets and the ruffled top, but wanted it to have the trendy high-low style.  Doray, this one is for you! Enjoy!!

BONUS:
**You could also take The Mimi Maxi Dress sewing pattern - CLICK HERE (or a maxi dress you already have in your closet) and follow step #5 through step #10 to make it a high-low style, too!


TUTORIAL:  How to Make a High- Low Maxi Dress
 
(from the Bardot Dress sewing pattern - complete steps #1-10)
(From a maxi dress you own - complete steps #5-10)
 
1. Gather materials:

Bardot Dress sewing pattern for Women - CLICK HERE

fabric needed (54" wide):
XS - 1 and 2/3 yards
Small - 3 and 1/8 yards
Medium -3 and 1/8 yards
Large -3 and 1/4 yards
X-Large - 3 and 1/3 yards
XX-Large - 3 and 1/3 yards

2 yards of 3/8 inch elastic
sewing machine, thread, scissors, pins, iron
2 yards of double fold bias tape

2. CUT OUT YOUR FABRIC:

When cutting out your dress fabric to make the High-Low Bardot Dress, cut TWO PIECES according to the size you are sewing:
HINT: If you are petite, subtract 2 inches from the length given. If you are tall, ADD two inches to the length given.

XS: 50 in long x 27 in wide
Small: 50.5 in long x 28 in wide
Medium: 51 in long x 29 in wide
Large: 51.5 in long x 30 in wide
XLarge: 52 in long x 31 in wide
XXLarge: 52 in long x 32 in wide

3. Cut out TWO PIECES for your ruffle fabric that are 9 inches long x the same width as given in the chart above. EXAMPLE: I would make an XS so mine would be 9 in long x 27 in wide and I would cut two of those.

4. Follow the entire sewing pattern to complete your Bardot Dress but do not hem the bottom.

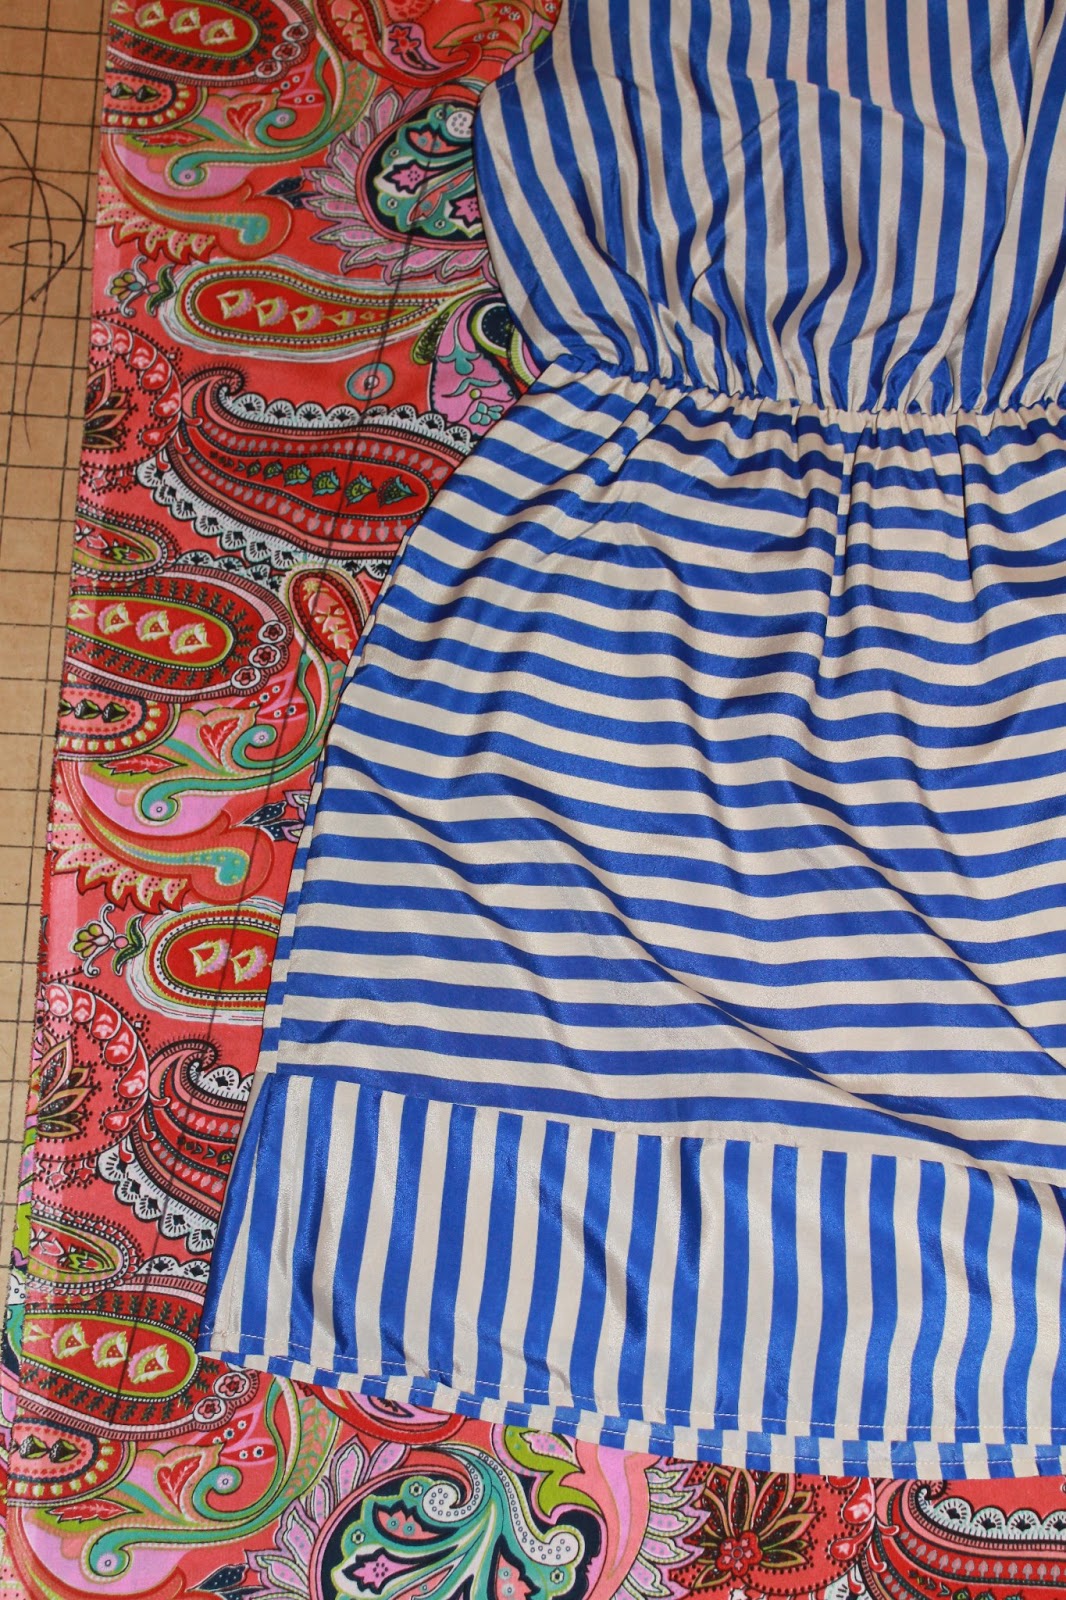
5. To give it a high-low hem, lay the dress with the side seams touching. The front of the dress will extend to the left and the back of the dress will extend to the right.

6. Decide how high you want the front hem to start. I want mine to start above my knee so I measure from the ground to that spot. It is 15 inches. (I am very petite - only 4'11" - so your measurement will most likely be a lot higher than mine!) Place a pin or make a mark at 15 inches above the left side of the dress on the ground.

7. Place a pin or make a mark 2 inches above the bottom of the side seam.


7. Draw a curved line starting from the 15 inch mark, extend it towards the right 4 inches in a straight line before starting to drastically curve the line down. When you reach the side seam, the line should have dropped to your 2 inch mark you previously made. Cross that mark and then slowly curve your line until it extends off the dress at a gently slope.


8. Cut off the fabric.

9. Serge and hem. (Or zig-zag stitch and hem) **HINT: Since this is a curved hem, you may want to do a rolled hem on your serger or use a rolled hem sewing foot.

10. Wear it!!

Thursday, June 13, 2013

Sunset Sundress for Women - sewing TUTORIAL- guest post for Melly Sews

If you haven't heard, there is a FABULOUS sewing series going on right now at the blog Melly Sews, called 30 Days of Sundresses!

The blogging line-up is amazing and I am so honored to be part of it again this year!

GoTo Sew Kitschy Coo Occasionally Crafty Naptime Crafters Sew Country Chick You and Mie Flamingo Toes Googiemama Delia Creates Melly Sews The Mother Huddle sewVery Alida Makes Sugar Bee Crafts Seamingly Smitten Boy, Oh Boy, Oh Boy! Sumo's Sweet Stuff Craftiness is Not Optional Elegance & Elephants Sew A Straight Line Kojo Designs Caila Made Family Ever After Mama Says Sew Simple Simon & Co. Little Kids Grow A Couple of Craft Addicts Image Map


Be sure to check it out every single day to see the latest sundress style! You will certainly be inspired!

Man it was hard deciding what type of sundress to make! I went back and forth between wanting to make a little girl's sundress or something for myself. I went with something for myself since I've been sewing for my kids lately. Time to add something special to this Momma's closet!


During the summer my husband and I have more date nights. The weather is warm, sunsets are gorgeous and there's nothing like being together. So how about a sexy, one-shouldered sundress to wear on a date night!?! Perfect!

1. Gather materials: dress from your closet made with the same material (to trace), your fabric (I used 1 yard of 60" wide rayon), scissors, pins, coordinating thread, iron, scissors, straight edge, sewing machine


2. Fold you fabric in half, matching your fabric selvage to selvage. We are going to cut a front and back piece out at the same time.


3. Lay your dress on top, centered.

4. Leaving a 3/8 inch seam allowance, trace from the underarm curve down to the hem + one inch further on one side only. (HINT: If your dress has elastic at the bodice or waist, stretch out the elastic to see the true width of my dress when tracing.)

5. From the bottom of that underarm curve angle up to the opposite shoulder seam with a gentle curve. Go across 6 inches (or more) to create the sleeve. This is simply the length you prefer. You could make it long-sleeved if you wanted!

6. Come down (9 inches for XS) for the sleeve opening.

7. Curve back in and down the side of the dress to the hem + one inch further. Cut out dress pieces. 

8.  **All seam allowances are 3/8 inches

Lay dress RST, pin and sew the shoulder seam. Serge or zig-zag stitch the edges. Press seam to the side.

9. Hem the entire neckline 1/4 inch then another 1/4 inch. Pin and sew as close to the double folded edge as you can.

10. Lay dress right sides together. Pin down the left side seam and then from the bottom edge of the "sleeve" down the right side seam. Sew down the pinned edges.

11. Hem the sleeve.

12. Hem the dress one inch. You're done!!

13. Plan a Summer Sunset Date Night and go WEAR IT!!!

Thanks again, Melissa, for having me today! Your 30 Days of Sundresses inspires me to try new things, too!!

Just for you Melly Sews readers, I have a special 15% off coupon code in my PDF sewing pattern shop valid from June 13 - June 20, 2013.  CODE at checkout: SUNDRESS15  

 Happy Sewing and Happy Summer!

Monday, June 3, 2013

Sewing TUTORIAL: Peplum Waist skirt for girls

Peplum Waist Skirt for GIRLS
 
I hope you all are enjoying a beautiful summer day! We are heading to the beach tomorrow - so instead of packing today - of course I'm sewing a last minute item for my daughter to wear :) Nothing like sewing when the kids are napping (after their fun day on the slip-n-slide)! The heat just wears them out!
 
I thought you'd enjoy making this so I wanted to share it with you! Happy Sewing!
 
Tutorial: How to sew a peplum skirt


1. Gather materials: fabric for skirt, fabric for peplum, pins, scissors, thread, fabric marker, iron, sewing machine

**I am making a size 4T. Adjust the measurements as suggested in steps #2-4 to make it fit your daugther.

2. Measure your child (or use a skirt she already has to figure out the final length and her waist measurements)

*My daughter's waist is 19 inches
*I want the final length of the skirt to be 10 inches long.

3. Add 3 inches to the length. (I did 10+3=13)

 *So for daughter's skirt fabric I will cut TWO PIECES that are: 13 inches long x 19 inches wide.


4. Cut your peplum fabric to be 4 inches long x 38 inches wide (or double her waist measurement). My peplum only goes on the front of the skirt but you can do yours on the front and the back. Just cut two pieces this size. (HINT: If you are making a larger size skirt, you can always make a 5 or 6 inch peplum to make it longer.)


6. Lay your skirt pieces right sides together and cut off 2 inches from the top. SAVE THESE to make the waistband afterwards.


7. Hem the bottom of your peplum strip. I serged it and left it as is but you can hem it 1/4 inch then another 1/4 inch, pin and sew the hem - or do a rolled hem.


8. Lay one skirt piece right side up. Gather your peplum strip to the width of the skirt piece and pin in place with the raw edges touching. The peplum will be right side up. Very important! I started pinning mine right sides together and had to undo it. Make sure you are looking at the right side of the peplum.

9. Sew peplum in place using a 3/8 inch seam allowance.

10. Lay your skirt pieces right sides together. Pin down both sides.

11. Sew down both pinned edges using a 3/8 inch seam allowance. Trim threads.

12. Lay your waistband piece right sides together and pin at the short ends.


13. Sew using a 3/8 inch seam allowance. Trim threads.

14. Place your waistband inside your skirt with the right side of the waistband facing the wrong side of the skirt. Match the side seams and pin the waistband to the skirt. (See how the right side of the waistband is touching the wrong side of the skirt?)

15. Sew using a 3/8 inch seam allowance. Trim threads

16. Flip waistband up and press seam allowance up with an iron.

17. Fold over a 1/4 inch hem towards the wrong side of the waistband edge.

18. Fold the waistband in half and fold it down to cover the peplum seam. Press with an iron. Pin in place.

19. Sew along the pinned edge as close to the waistband double fold as you can but STOP SEWING 3 inches before your starting point.

20. Cut a strip of elastic 1 inch shorter than your child's waist. Insert into the waistband casing. Overlap elastic strip edges 1/2 an inch. Zig-zag stitch to secure. (HINT: I use a safety pin to snake the elastic through the elastic casing.)


21. Sew the opening of the waistband closed. Trim threads.

22. Hem the skirt 1/4 inch then another 1/4 inch, pin and then sew to secure. Then do a happy dance!! Let your little girl try it on and SMILE when it fits just perfectly!!!


It would also be super cute with a bias trim on the peplum instead of hemming it! Use a fun color and make the peplum pop!!


What have you made this summer? Comment below! I'd love to hear from you!

Have fun sewing!!
Linked to these linky parties:
CRAFT-O-MANIAC