Pages

Thursday, January 31, 2013

Sewing TUTORIAL: Envelope Back Pillow

SEWING TUTORIAL: Envelope Pillows - How to sew an envelope pillow

Have you been wanting to recover your pillows but haven't gotten around to it? Well once you see this ENVELOPE BACK pillow cover you just might run to the fabric store and get started today!

Pillows have always been a great starter project for a beginner sewer. You cut a front and a back, place them right sides together, sew up three sides, turn it right side out, stuff it and hand-sew the final side.

This one is even EASIER than that!


I'm going to show you how to sew an envelope back pillow that doesn't even need hand-sewing! Awesome, right?

Let's get started!


1. Gather materials: pillow fabric, pillow you want to cover (OR A PILLOW INSERT), straight edge, measuring tape, pins, sewing machine, iron, thread


2. Measure the pillow you want to cover or make.  Mine is 13 inches long x 20 inches wide

3. Add 1 inch to each of these measurements. Mine would be 14 in long x 21 inches wide.
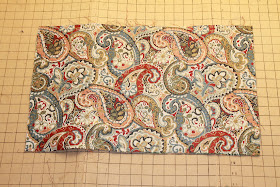
*Cut ONE FRONT to make your pillow with these measurements.
*So I would cut one piece of fabric that is 14 in long x 21 in wide.

4. Let's figure out the size of the two back pieces. They will overlap. So I figure out what is half of the width I need and then add 3 inches to that.  Mine would be 20 / 2 = 10 + 3 inches = 13 inches

The length would the same as your front pillow cover (Mine is 14 inches).
So my TWO BACK pieces would be 14 in long x 13 in wide.

5. Cut your BACK pieces.

6. Time to sew! Lay your two back pieces right sides down. Hem one side of each (the length side; so I am hemming my 14 inch side on both of them. I hem them by folding over a half inch, pressing with an iron, folding over another half inch, pressing with an iron and pinning in place. Then I repeat for the other back piece.

7. Sew along your hemmed edge as close to the double folded side as you can (I used a 3/8 inch seam allowance). Repeat for the other pinned edge.

8. Assemble! Lay your front cover right side up. Lay your back cover pieces right sides down and line up the side edges (the length). They WILL OVERLAP in the middle. This is what you want!


9. Sew around all 4 sides of your pillow using a 5/8 inch seam allowance.

10. Clip corners and turn right side out. Stuff it or fill it and you are DONE!


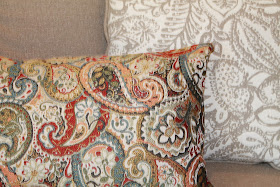
Envelope pillow perfection! See how simple?
 The colors coordinate with the curtains (they're toile) but aren't too dark to be overwhelming. I do love color though! If it's a pillow, curtains, a rug...it's all changeable! Stay with neutral paint colors on the walls and stick with neutral furniture fabric and your room can last years! If I get bored with these pillows I just grab another remant at the fabric store and start sewing!

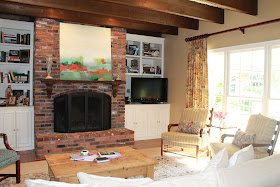
This is our living room which is definitely a kid's space, too! See those toys on the coffee table? :)

I took these flowers off the kitchen counter this morning and put them on this side table. I love the softness it adds to the room, so I think they will stay.

One remnant piece of fabric, thirty minutes and a cup of coffee later and you will have two envelope back pillows to add some personality to some chairs, the couch, your bed, or even your child's room! I hope you try it! It's super simple and since there's no hand-sewing involved, this is one fast and fun project!

Happy Sewing!
Jenny
www.seaminglysmitten.com

Wednesday, January 30, 2013

Women's Sewing Patterns - Cowl Top sewing pattern

Above: Kelli from the blog Small Town Stitcher
(Check her out if you love to quilt!)

Women's Cowl Neck Top
sewing pattern
sizes XS-XXL

Whew! I've been very busy over here working on my Spring line of Seamingly Smitten sewing patterns! Many of you have emailed me asking when I was going to make more Women's Tops and I am so happy that you all are sewing for yourselves!! Here is one that has been pattern tested already and is in the pattern shop for sale now. I already have another Women's pattern in the works and just finished scaling the pattern pieces to size today! Tomorrow I will try to write it up and get it out to testers before the weekend.

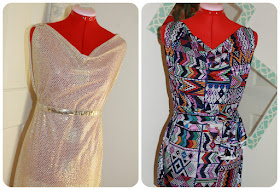
Do you know what my testers said about this pattern? They said the fit was SPOT ON! I was THRILLED to hear this because we all come in such different shapes and sizes and it is hard to make a pattern for all those shapes. But, since this is my first KNIT sewing pattern, this top has a draped, flattering neckline and is pullover style. No buttons, no zippers, nothing hard here to sew!

This Cowl Neck Top will give you a sophisticated style when done in a graphic print or can even be as casual as you'd like. Try it in a jewel tone, bold print, chevron knit or even your basic black. You will sew this one again and again.

As always, I LOVE showing off what you all sew! So I'm leaving you all with tons of pattern tester photos today. Real women, in all shapes and sizes, in the Cowl Neck Top they made - and they are all HAPPY to show it off to you!!

 
Below: Made by Theresa

Below: Made by Donna P

Below: Made by Donna P

Below: Made by Joelle W.

Below: Made by Kelli


These are the ones I made and have already worn! My husband wonders why I still shop for myself if I just wear what I make, but what woman can give that up? :)
Enjoy, Ladies!! I can't wait to see what you make with this pattern!!

Monday, January 28, 2013

Sew Fab e-Pattern BUNDLE SALE!! 18 patterns - $24.95

Coming next week!

From February 4th- February 11th...

the FIRST EVER


For one week only, ten pattern designers will be joining together to combine 18 of their best PDF sewing patterns (valued together at over $139.00) and selling them to you for the incredible price of $24.95! That's over 80% off of the combined retail value!

That wasn't a typo! For less than $25.00 you will have the chance to purchase a library of resources to get you started on several great projects that you can sew over and over again.

The designers that are joining this sale are experts at their craft. They have been sewing for a very long time and are well known in blog land as well as in children's and women's sewing pattern design circles. Each designer has contributed one or two of their favorite sewing patterns to create a bundle that is sure to please!

Whether you are sewing for your own family or making gifts for others, these are patterns that you will love to use. Figgy's Patterns, Go To Patterns, peek-a-boo pattern shop, Seamingly Smitten, One Girl Circus, Sew Much Ado, luvinthemommyhood, Gingercake, Sew Fearless, Me Sew Crazy... this is the lineup! But you have to wait until Monday to find out exactly which sewing patterns are included in the pattern bundle. I can tell you that you won't be disappointed!

We are offering an affiliate program for this amazing sale too! If you think your blog readers, Facebook friends, or Twitter pals would be interested in buying this bundle of sewing patterns, why not sign up as an affiliate? As a Sew Fab Sale affiliate you can sell the pattern bundle on your blog and earn 40% of all of your sales! Contact Jenny at thesoutherninstitute @ gmail.com for details.

Oh! And there will be a giveaway! The Sew Fab Giveaway is amazing! One lucky winner will win a bunch of amazing prizes from some of your favorite companies and online shops! I can't wait to reveal the giveaway package next week!

Don't miss the Sew Fab e-Pattern Bundle Sale

starting Monday, February 4th!

Sponsored by
The Southern Institute and Fat Quarter Shop


We'll see you there!

The Sew Fab e-Pattern Bundle is only available from 8 am EST February 4th through 8 am EST February 11th. Due to the nature of the sale there will be no late sales or refunds.

Friday, January 18, 2013

Sew Along - Day 5 - Valentine's Day Dress - attaching the skirt

Valentine's Day Dress
SEW ALONG
Day 5 - final day!

Today is the day we finish this dress! I know some of you have been waiting for today to come so you could try that dress on your little girl and it's finally here! We are going to attach the skirt to the dress, hem the dress, hem the sleeves and add a ribbon tie and then we are DONE!
 
Please email me or comment below if you enjoyed this sew-along! It was a lot of work and I want to know if you'd ever like to do another one. I hope you had fun and learned something!
Happy, happy sewing!


When you finish your dress please be sure to add a picture of it on our Facebook page, email it to me or add a link to your blog post about it in the comment section below below. You can even do all three just to show it off!

If you're just getting started, you can find the previous days here:

Monday - Day 1 - CLICK HERE - print the pattern / cut out your fabric
Tuesday - Day 2 - CLICK HERE - assemble and line the bodice / add the collarWednesday - Day 3 - CLICK HERE attach the sleeves / finish the bodiceThursday - Day 4 - CLICK HERE - Buttons and buttonholes (with videos)
Friday - Day 5 - Attach the skirt and tie and DONE!

Yesterday I filmed some short videos that hopefully helped you learn to sew on a button and sew your buttonholes for the dress we are making. If you missed them, they can be found here:

VIDEO 1 - How to sew a buttonhole PART 1 - CLICK HERE

VIDEO 2 - How to sew a buttonhole - PART 2 - CLICK HERE

VIDEO 3 - How to sew on a button with your sewing machine - CLICK HERE


1. Time to baste stitch the bodice's waist. Place a pin parallel to the bottom edge of the bodice, to hold the left and right bodice layers together (under the bottom button).
 

2. Baste stitch all the way around our bodice, sewing through both layers of fabric, until you get back to your starting point. This helps hold your fabric together evenly as you pin it to the skirt.
 
 
 (I hem my skirt now, before I go to step 3. But you can do it now or hem it as your final step. )
 
3. Lay your skirt fabric right sides together with short edges touching. Pin down the short edge. Sew along the pinned edge using a 3/8 inch seam allowance. Serge or zig-zag stitch the raw edges. Trim threads. Press seam to the side with an iron.
 
 
***You can either sew a basting stitch around the top of your skirt and pull the bobbin thread to gather it to fit evenly to the width of the bodice, pin to the bodice with right sides together and then skip to step 7 OR follow steps 4-6 to gather it without using a basting stitch. ******
 
4. Turn your skirt inside out and upside down. Slide the bodice into the skirt fabric. Center the skirt seam to the center back of the bodice. Pin. Repeat for the front center.


5. You are going to find the center between your two pins on the left side of the skirt fabric and pin it to the left side seam of your bodice. Repeat for the right side and match it to the right side seam.
 
 
6. Continue finding the center of the skirt fabric between any two pins and pinning it to the midpoint between those two pins. This helps you evenly space your skirt fabric. Continue until the skirt is evenly gathered.
 
7. Sew around your pinned edge using a 5/8 inch seam allowance. Serge or zig-zag stitch the raw edges. Trim threads.
 
8. Flip skirt down and press with an iron. Make sure you press the seam up towards the top of the dress. Topstitch to hold the seam in place.
 
 
9. Time to hem the dress.  Fold up a 1/2 inch hem, press with an iron and then fold up another 1/2 inch hem, press with an iron and pin in place. Sew the hem.
 
10. Time to hem the sleeves. Fold up a 1/2 inch hem, press with an iron and then fold up another 1/2 inch hem. Press with an iron and pin in place. Repeat for other sleeve. Sew each sleeve's hem.
 

11. Cut a piece of 1 inch wide grosgrain ribbon to 22-30 inches long (your preference). Fray check either cut edge of the ribbon OR hem the cut edges of the ribbon by folding over the ribbon 1/4 an inch and then another 1/4 an inch. Sew to secure. Repeat for the other raw edge.
 
 
12. Center your ribbon at the waist. Sew on with a few stitches. Backstitch. Trim threads.
 
You DID IT!!!
 
Are you proud of yourself? I hope so!! I'd love to hear from you!!
Please email me your finihsed dress picture or post it on facebook! You can also add a link in the comments below if you want to show off your dress on your blog!
 
*My little 3 year-old sat on my lap and helped me sew the hem and sew on the purple ribbon. She was a doll! When she tried it on she hugged me and said, "Mom, I couldn't have done it without you!" Ahhh! My heart just about burst with joy! What a beautiful moment of sweetness from that cutie's mouth!
 
Below: My little girl in her new dress! It was hard getting her to smile - she just wanted to go play with her markers! :)


Happy Sewing!
Jenny