Pages

Thursday, March 29, 2012

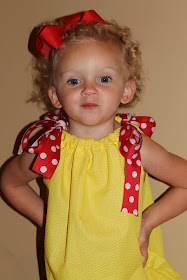
Easy Pillowcase Dress sewing pattern - pattern testers needed

Pillowcase Dress Pattern
sizes 6 months - 6 years

My latest pattern is ready! Even if you are a true beginner, you can do this! When I started sewing I started with pillows and pillowcase dresses. Some cutting, some ironing, some pinning and some sewing. Simple enough, right? Yes, you will LOVE this Classic Pillowcase Dress pattern and the little girls in your life will, too!


Have you been looking for a basic pillowcase dress pattern? Do you want to sew something quick, yet with that boutique style, to spruce up your child's wardrobe? Then this is the pattern for you!

This is your basic, classic, EASY to sew pillowcase dress! There's no fussy bias tape to deal with, but rather simple sewing with some ribbon ties. You can embellish this dress however you wish - with appliques, embroidery or your sweet little one's monogram. Can't you just see your daughter in a simple white seersucker pillowcase dress for those summer photos on the beach?

PATTERN TESTERS needed:
sizes 6-9 months, 9-12 months, 3-4 years and 5-6 years
(Size 1-2 taken care of already)
If you can sew up this pattern (even if you are a true beginner) and give me some feedback by April 1st, leave a comment here or email me: seaminglysmitten@gmail.com

Want to see what I whipped up today? My little model, Catherine, was being a complete hambone and making me laugh!

"See me hide, Mommy? giggles! You can't take my picture!"
 "Do you hear the thunder? It goes BOOM!" - holding back her giggles!
 "Hands on my hips!"
 "Ta-Boom! I hear thunder, Mommy!"
 "No more pictures. I see Dora." :) Gotta love a 2 year old!
I will let you know when this one debuts. It truly couldn't get any easier!
Happy Sewing!

Tutorial: Easter Bunny Applique Shirt

Isn't it hard finding super cute things for boys this time of year? Girl's Easter outfits, dresses and appliqued shirts are everywhere but boys seem to have fewer options. I wanted to make my son an Easter shirt that wasn't too babyish (he's 3 years old) and didn't take too long. (How much time do I really have to be crafty each day? Just naptime of course!) So here's a super quick tutorial for a simple and sweet Easter bunny shirt for boys or girls! Enjoy!

TUTORIAL: Easter Bunny Applique Shirt

1. Materials: fabric for bunny applique, heat-n-bond, iron, bunny shape and a t-shirt

 2. If you remember I made this shirt for St. Patrick's Day...but I did not sew around the edges. I simply ironed on the shape with some heat-n-bond. The shirt was worn a few times and washed about 4 times. The clover stayed on!  This shirt was made literally a day or two before St. Patrick's Day and I knew it wouldn't be worn often- that's why I didn't sew around the edges. It's a perfectly good shirt and I wanted to use it again.

** Peel off the previous applique if there is one.

3.  Lay your heat-n-bond on top of your printed bunny shape (or whatever applique shape you are using). **Make sure the paper side of the heat-n-bond is facing up.

4. Trace your shape.

5. Iron your heat-n-bond onto the BACK of the fabric you are using for your applique.
 6. Cut out your shape.
 7. Peel off the paper backing, place it on your shirt and iron in place.
 8. Sew around the edges of your applique.
OPTIONS:
1. Sew around the bunny using a wide zig-zag stitcht. Make sure you needle goes on the bunny then off the bunny with each stitch.
2. You can use a straight stitch all the way around, staying as close to the edge of the bunny as you can.
3. You can use a basting stitch all the way around if you want to remove the applique later. (Thanks to Maridith of Strictly Homemade for sharing that tip! CLICK HERE: Temporary Holiday Shirt Applique TIPS!)


 Done and ready to wear!

Have a Hopping Happy Easter! What have you all been sewing? Who is tackling your own children or grandchildren's Easter outfits? (or nieces, nephews, godchilds...etc?) If you have a link to it we'd all love to see! Leave it in the comment section!

Happy Sewing!
Jenny

Wednesday, March 28, 2012

New Pattern and GIVEAWAY!

Head on over to Create H.O.P.E. Designs blog (click here) and read about our
HUGE PATTERN LAUNCH GIVEAWAY!
3 winners, 3 patterns each!


You can read more about my Carolina Coast Dress sewing pattern there and if you want to give to a great organization, please add one of their patterns to your cart!
Each pattern is only $5.00
and designed by pattern designers you know and love!

Check out their patterns HERE or HERE or HERE. All proceeds go to orphanages in China and Bulgaria. If you want to read about my involvement and why I was called to do this (I felt some heart-tugging.) read about it by CLICKING HERE.  You'll find out some new facts about me (Did you know I used to be an elementary teacher? Oh yes! I loved my first graders!) and I hope you will LOVE this pattern!


You can find The Carolina Coast Dress sewing pattern HERE. Have fun sewing some spring and summer dresses! Let the beach vacation countdown begin!

Double Ruffle Halter Dress sewing pattern


Have you seen our Double Ruffle Halter Dress sewing pattern yet? I think it's one of my favorites, though I do have quite a few favorites of course! One of my pattern testers, Teresa, just posted about the dress she sewed for her precious little daughter. See her post by CLICKING HERE.

Here are some more dresses that mommies and testers have made:


I just sewed this one myself (above) to send off to a photo shoot! I'm working on some new Seamingly Smitten sewing pattern covers and can't wait for you to see them!
Get your Double Ruffle Halter Dress sewing pattern by CLICKING HERE.

Saturday, March 24, 2012

How to make your own crib sheets - inspired by Strictly Homemade

Have you ever looked in the stores for the most perfect baby bedding and not found anything you loved? Or have you looked at the prices and thought, woah, I will definitely not buy that from PBKids. :) Well, no need to fret! With just a few stitches and some elastic, you can MAKE YOUR OWN crib sheets! That means polk-a-dots, cars, trains, trucks, gingham, stripes or solids....you name it and you can make it!

A few weeks ago I came across a tutorial at the blog Strictly Homemade that got my mind spinning! It was a tutorial that showed you how to make your own crib sheets. Genius, Maridith!!
 CLICK HERE to see the tutorial.


We went to Hobby Lobby the other day and came across this cupcake fabric. Catherine (my 2 year old) said, "I want dat, Momma. Yook, it's tupcakes." Well, any 2 year old fabric loving girl is a girl that will get her wishes! So I scooped up 1 and 3/4 yards of it and headed home to wash it and get started.

My mattress was a little shorter than Maridith's, so I adjusted it. Here's a quick recap:

1. Cut your fabric to size. I cut it to 67 inches LONG x 44 inches WIDE (or the width of your fabric). This is a rectangle. Easy, right?
2. Hem all sides 1 inch. HOW? Fold up each side 1/2 an inch, iron, fold it up another 1/2 an inch. Iron and pin. Sew all 4 sides along the pinned edges.
3. Fold your fabric in half lengthwise, then widthwise. Where your corners meet (not along the fold)cut out an 8 inch square at each corner through all layers. When you open it up you have cut out an 8 inch square at each corner. Great!
4. Pin corners right sides together and sew. Trim threads.
5. Cut 4 strips of 1/8 inch elastic that are 12 inches long each.
6. Starting 8 inches away from the corner fold, place your elastic, sew a few stitches and then pull your elasitc taut (tightly) as you sew your elastic along the middle of the elastic to keep it in place. You will sew it towards the corner then extend it past the corner another 8 inches until you reach the end of the elastic. Your elastic will gather the corners of the sheet to hold it in place on the mattress.
7. Repeat for all corners.
8. Put on the bed and enjoy!
9. Next...think about a new bedskirt :)


All the baby dolls love her new sheet, too.


John Patrick loved clowning around in the crib, too!


And after all that sewing, Catherine said, "Don't take my picture, take my toesies picture."
She's our Lady Cakes!
Happy Weekend Sewing!
Enjoy 30% off your sewing pattern purchase today through Sunday night.

COUPON CODE: Easter30
But a sewing pattern here. PATTERN SHOP

Wednesday, March 21, 2012

H.O.P.E. Designs - Carolina Coast Dress sewing pattern

Create Hope Designs

About 2 weeks ago I found the blog Create H.O.P.E. Designs and I know it was God that brought me to that site. It only took a few seconds of reading about all the children in need, that my heart was touched. Before I became a Mom I was an elementary school teacher and taught first through third graders and absolutely LOVED it, so there's a special place in my heart for little ones. Even though those children were not my own, I treated them like they were. I always looked for the goodness and kindness in those children and found it in their innocent hearts. Every day they inspired me when they said something kind to a friend when they thought no one was listening, when they prayed for others in their morning prayers and petitions, when they tried to draw Heaven and I overheard a boy tell a friend, "I hope Heaven has rope swings so we can swing from cloud to cloud," and I learned more about myself and other's needs through it all. I encouraged them, guided them, inspired them to create and learn and received so much back from them each day.


Once I became a Mother to first my son and then my daughter, I stayed home to be their Mom. My world suddenly was filled with playdates, to-do-lists, laundry piles, diaper boxes and was wonderful! I could not have asked for anything more in my heart. But, my world got a little smaller in a way because I wasn't going to work each day, meeting with my co-workers, talking to "my" students and cheering them on as they learned to read or write. When I started sewing some of my children's clothes it was a renewed sense of self, of joy, of love, of inspiration in my heart. I was using my talents and started teaching my friends to sew. Watching my friends learn and fall in love with their new skill of sewing and creating something with their hands encouraged me to help other Moms do the same thing. Wanting to share my talents and creativity, I started creating my own PDF sewing patterns for beginners. This was a way for me to teach others something that I loved and encourage and guide them to love it, too. It came naturally to me to simply whip up a drawing, sew up a sample, create a pattern and write up a tutorial. It was like making a lesson plan for my first graders - step - by - step. Seamingly Smitten was created and my heart and soul are inspired to keep helping and creating others!


But, I know God wants me to share my gifts and talents, like I did when I was teaching. So it made so much sense and felt so "right" to want to help out the H.O.P.E. Design organization. They are an organization created by the designers from the Izzy and Ivy Designs sewing pattern collection. These ladies have huge hearts, the desire to help and know just where they want their help to go. Please go read about what they are doing with each pattern sale. It will inspire you! Each pattern is sold for $5.00 and every dollar - every single cent - goes to orphanages (so far either China Little Flower or One Heart Bulgaria) that are overflowing with children to provide them supplies, caretakers, medical supplies and in turn, HOPE.


I am so happy to be a sewing pattern designer and to share this pattern with H.O.P.E. Designs. It is called the Carolina Coast Dress and will be sold exclusively through H.O.P.E. designs. When you purchase this sewing pattern 100% of the proceeds will go directly to help those children who don't have voices, yet need as much love, care, clothing and a family as we do.

I will keep you posted as to when it debuts. I enourage you to purchase any H.O.P.E. Designs patterns so those little children that you or I will never know, will never see, but our hearts can reach out to them, can have more HOPE each day!


God has given each of us so many talents and traits that we should share with one another.
 I sew. I design. I create. I love.
This is what God wants me to give back.

Happy Sewing!
Jenny
Seamingly Smitten

Friday, March 16, 2012

St. Patrick's Day Dress and Applique


Tomorrow we are heading to the St. Patrick's Day parade with the kids. My husband called this morning and asked if we had a super cute dress for our daughter, Catherine. I instantly said, "Yes, a green and white polk-a-dotted one" EVEN THOUGH....drumroll please...it wasn't made yet! I went fabric shopping two days ago for the fabric and had every intention of sewing her dress the past 2 days, but man time just flies! So this morning I whipped out this little number and I love it!


I used this Classic A-Line Dress sewing pattern - click here -  to sew the dress. But, this pattern is reversible and I only wanted one dress. To improvise it is super easy! Cut out your 2 dress pieces ( a front and a back), then cut out a bodice front and back. Hem the bodice pieces. Hem the dress pieces. Then sew the dress as the pattern says. It was finished in about 25 minutes! This afternoon I added the clover applique and I can't wait for Catherine to try it on afer her nap.

To make the applique I printed this: 


I traced it onto some heat-n-bond, ironed it onto the back of my clover fabric, cut it out, peeled off the heat-n-bond paper and ironed it onto the dress. Once you stitch all the way around the clover, you are done! 

And, since Easter is right around the corner, I will actually put an Easter applique over the clover next week. That way I won't have to make another dress - even though I do want to make a few more and add some ruffles to one, ruffled sleeves to another, buttons to another....oh the ideas!

Wish there was more time to sew each day!
Happy Sewing!
What are your sewing plans this weekend?

Thursday, March 15, 2012

WIN (3) 18" Doll Clothing Sewing Patterns by Strictly Homemade

Today, Maridith, from the blog, Strictly Homemade, is
GIVING AWAY THREE 
 18" doll clothing sewing patterns to one winner!
AND
Another winner receives one handmade Karen Ballgown made by Maridith, herself!! Woohooo! (see below)


Maridith has been such an awesome blogging friend of mine over the past year! I "met" her a while back when she volunteered to test one of my PDF sewing patterns for beginners and I've been hooked on her blog since! She is always creating something new for her 3 kids (like these Spiderman birthday party gift bags),


sewing something for someone else (like THIS awesome baby bedding sheet TUTORIAL),


giving great money-saving tips even when it comes to using your Silhouette, (like this Press and Seal silhouette transfer tip!)


and even creating and designing 18" DOLL clothing sewing patterns!


Today, Maridith is GIVING AWAY a set of 3 of her doll clothing patterns to ONE winner. Want to see what they are? Check out how precious these skirts are! This pattern even included three different skirt designs. How trendy will your little girl's doll look in one of these!?!


Check out Maridith's NEW RELEASE! She JUST created this doll pattern and released it TODAY! It is called the Karen Ballgown and is AMAZING!!! Just imagine all the priceless, photo-perfect tea parties your little girl and her doll can have all dressed up.

Maridith is ALSO GIVING AWAY one Karen Ballgown (example below) to ONE winner. That's one adorable, handmade dress (by the designer, Maridith, herself) to ONE LUCKY WINNER!
I'm even in love with the color of the dress she used! And here is her third pattern that she designed. It's called the Holiday Dress. But don't let the name fool you! Imagine all the sweet summery dresses you could create if this was made out of a seersucker material, polk-a-dot material, lace eyelet or even your little girl's favorite flowery material!


She also creates some doll patterns that she shares FREE on her blog!
You can check out her FREE patterns here.


Imagine your little girl and her doll in a matching shirred sundress (below). Picture perfect!
To enter to WIN, you can LIKE Strictly Homemade on Facebook, follow her blog or tell her which is your favorite project from her blog!

Winners will be announced March 23rd. Good luck!!

And if you simply can't wait to see if you are the winner and want to purchase one (or 2 or 3) of her patterns...get this...they are only $2.50 each!! Yes, you read that right! $2.50 for each pattern. Bargain!! I'm off to order 2 for myself :)  CLICK HERE TO PURCHASE.

Good luck and Happy Sewing!! Enter now!

a Rafflecopter giveaway