Pages

Tuesday, January 31, 2012

Double Ruffle Halter Dress coming soon!

Like us on FACEBOOK to find out about new patterns coming soon!

We love hearing from you!  

Write on our wall OR share a picture of your Seamingly Smitten creation!

I've been hard at work over here finishing up patterns and starting new ones for you! I just finished the Ruffles Galore Pinafore sewing pattern and I'm working on the coordinating pants pattern. The pinafore pattern is off to testers and will be up for sale next week! It's a perfect little outfit for Spring and Summer and your little one will have fluttery sleeves and you will have the option of a single or double ruffle added it it. The more, the better, right!?!

Here is the dress I'm working on next. The bow can tie in the front or the back and is rimmed in ruffles of course! You can even add a fabric flower to the front where the straps join to add one more boutique touch!

Monday, January 30, 2012

Cupcake Solo Skirt

When my daughter walked into the toy store to get a friend a birthday present she came across a darling, pink piano. As soon as her little bottom touched that stool and her fingertips touched the keys she started singed, "Twinkle, Twinkle, Little Star." It just melted my heart. So what does a Mommy do? Call Daddy and beg him to get it for her!


And if the pink piano wasn't enough for this little girl, when she saw this cupcake fabric she simply had to hold the bolt in the store! What does a Mommy do then? Sew her a skirt of course!


 A basic skirt sewing tutorial is coming soon. Check back soon!!
What sweet things have been going on in your sewing world?

Tuesday, January 24, 2012

Ruffled Pinafore and Ruffled Capri Pants sewing patterns

Have you been looking for a Ruffled Pinafore Sewing Pattern for your little girl? This pinafore sewing pattern has been revamped, restyled and offers you options to make it as ruffly as you would like it!

This little girl is one happy model!!


Email me at seaminglysmitten@gmail.com or comment here if you want to PATTERN TEST these sewing pattern! They are the Girl's Ruffled Pinafore and Girl's Ruffled Capri Pants sewing patterns. Pants come with single and double ruffle options. Sizes to test: 6-9months, 1-2 T, 3-4 T, 5-6T. I will send it to you by the weekend and you will have a week to sew it. I will need feedback and some pictures of your little girl in her ADORABLE outfit. :) Can't wait to see what YOU CREATE with these patterns!!
********************************************************************************

A HUGE thank you goes out to Beth Gold Photography. If you live in or around the Baton Rouge, Louisiana area check her out! She has taken portraits of my children and has captured all the Seamingly Smitten models on camera beautifully! Beth has an amazing eye and brings out the beauty of your child in each picture. Here are some moments she captured of my children when they were younger. Of course I am completely biased when looking at the pictures below, but they will always be beautiful in their Mommy's eyes! :)


Oh why do they have to grow up so quickly? I love those little toes and silly smiles!

Happy Sewing everyone!
Email me or comment if you want to pattern test.
Jenny

Monday, January 23, 2012

Customer Creations

I love getting pictures to see what customers are making with my sewing patterns! Kelly had just sewed a shirt using the Miss Mod Top sewing pattern for herself and had enough fabric left over to make a matching one for her daughter! Look at this sweet girl! She even wore matching jewelry!

 This is what Kelly had to say,
"I bought this pattern from you last week. I made my shirt yesterday, and just had enough fabric left over to make a matching one for my almost 7 year-old. She is absolutely thrilled since she loves to match me. Please notice that she pulled the matching accessories from her Pretty Pretty Princess game to coordinate. As she always says, "I like to be fancy".  Maybe one of these days I'll feel fancy and get a photo of my shirt to send your way as well. I really enjoyed making the shirts and love that they work up so quickly. Thanks for a fun pattern!"
Kelly

Kelly, your daughter is adorable! I hope one day my daughter will want to dress just like me, too!
*****************************************************************************
 This is Missy, from the blog Missy's Homemaking Adventures. Can you believe she rode a camel? This sure looks like a fun adventure on a beautiful day at the zoo! You can read about the matching purse she made for her cape here and the cape she made for her friend, Lynn, here.

Missy even made herself a hat from the same material she used to make her cape!
Thanks for sharing, Missy!

Saturday, January 21, 2012

My Date Night Dress


Yesterday I blogged about wanting to sew something for myself. My husband and I made a last minute plan to have a date night to go to a movie and I immediately wondered what I would wear. We've been together about 17 years now, so clearly I still need to try to impress him. :)  As soon as I dropped the kids off at preschool I found my car heading in the direction of the fabric shop instead of the mall (because making something is more fun than buying something new sometimes). I LOVE fabric. I have to admit it is hard to find quality apparel fabric in my town so sometimes it is frustrating going up and down the aisles, but yesterday I was determined to find something! I felt everything in the store that caught my eye and I stayed away from polyester and poly blends. They do not iron well, look cheap and fray - not what I'm going for right now. I came across this awesome rayon print, grabbed a yard and a quarter and headed home to wash it!


You can see the dresses that inspired me here. I am attracted to prints and dresses that gather in at the waist because I tend to have a pretty straight figure, so any way I can add some curves I do.


I decided to make a halter style dress with one srap that I can tie into a bow and and toss over my shoulder towards the back. The little surprise about this dress is that I added POCKETS :) Who doesn't like pockets? I love them, but sometimes they can make a dress look too bulky in the hips depending on what material you use. This rayon material is soft and has a nice drape, so I went for it.

For visual interest (and to make it figure flattering) I added 3 rows of shirring under the bust.


Here are some pictures of it. Date night was a blast and my husband gave me the best compliment ever! He asked, "Is that new?" Which translated means, "Did you go shopping and not tell me?" I was so excited to tell him that I made it and I was so glad he noticed! (In the pictures I'm wearing sandals, but last night it was a little chilly so I wore it with tall brown boots and a shrug. Who doesn't want to add a versatile dress to their wardbrobe? I definitely do!)


What's your most favorite piece of clothing you have sewn for yourself? Happy Sewing everyone!

Friday, January 20, 2012

Dresses that Inspire

Do you ever want to sew something for yourself the moment you find out you are going somewhere? Not as in a dress that you are going to take weeks to sketch, plan, fabric shop, wash, prep/iron, cut and make a muslin. Who has that time? Or maybe it's because I am just so ready to have something new in my closet that I made for myself. Perhaps it's selfish sewing, but sometimes it calls my name. Tonight my husband and I are going out and I decided that I would make myself something to wear. This is no small task of course and first I had to find some inspiration. My fingers quickly typed Modcloth as soon as I found myself in the parking lot of the fabric store and these dresses stood out.

 
All images from: http://www.modcloth.com/

If you know me, you know exactly why I chose these dresses. Printed fabric is like eye-candy to me! I try to shy away from the solid black dress. I'm also very petite and want something that gives my body some shape and draws in at my waist. The white one looks like a sundress and I realize we are in the middle of Winter, but the bottom of the dress caught my eye.

I'm off to sew! The fabric is washed and ready and the ideas are spinning in my mind. Check back tomorrow to see what I made!
What have you sewn lately? Do you get these creative whims and just go with it without a plan or do you take your time and really think it through?

Thursday, January 19, 2012

Featured today on Sew Can Do and Customer Show-off

Check out the Seamingly Smitten feature today on Cheryl's
Sew Can Do blog!
Get this Ruffled Collared Cape sewing pattern in the shop.

Also, show off what you have sewn using a Seamingly Smitten sewing pattern and get 1 free sewing pattern from our shop! Email me a picture of your cutie in a Seamingly Smitten creation: seaminglysmitten@gmail.com
(First 5 customers only. Limit one per customer.) Hurry, hurry!

Happy Sewing!

Customer Show-Off = one FREE pattern!

 Have you made anything with a Seamingly Smitten sewing pattern and want to share it?

The first 5 customers that email me a picture of something you have sewn using one of our patterns will be featured on the blog and facebook and get
ONE FREE SEWING PATTERN
of your choice!  (Limit one per customer.)

Email me at: seaminglysmitten@gmail.com to show it off!


I thought it would be fun to start the weekend off right with some free patterns!

Other than that.....I've been very busy getting patterns ready to debut this year and I hope you are ready to sew up lots of ruffles!

Wednesday, January 11, 2012

100 SALES = HALF OFF!

Woohoo!!! The ETSY shop has 97 sales and counting!!
Thank you, thank you!

CLICK HERE to SHOP!
As a THANK YOU to ALL Seamingly Smitten customers, Facebook friends and blog readers let's celebrate!!

The next few customers win FREE sewing patterns!!

Sale #98 and #99 will each receive one FREE sewing pattern with your purchase from the shop!

sale #100 will receive TWO FREE sewing patterns with your purchase from the shop!

Sale #101 and 102 will receive one FREE sewing pattern with their purchase from the shop!


*****PLUS everyone can use coupon code SEWHAPPY and get half off your purchase!
That's right, 50% off your entire purchase  from the shop!


Have you had your eye on a sewing pattern and were just waiting for the right time to buy?
Get it now while you could get it half off!


Start shopping!
Coupon code ends January 18th at 11:59pm...enjoy it while you can!!

Tuesday, January 10, 2012

Women's Shrug Sewing Pattern - TESTERS NEEDED

Women's Shrug Sewing Pattern
by Seamingly Smitten

Calling all sassy ladies...our WOMEN'S SHRUG sewing PATTERN will debut soon! 
I am looking for 3 pattern testers - (sizes Small,  Large and X-Large). Comment below or email me at seaminglysmitten@gmail.com if you are interested. Sews up in less than 45 minutes - many embellishment options given. Will send the pattern to you by Friday for you to sew by next Friday.
Super easy and super chic!!


Looks beautiful with a brooch!

 It can be plain and simple - or as embellished as you can imagine.
This shrug can spice up your wardrobe in less than an hour.
I cannot wait to see what you women sew with this one!
Happy Sewing!
~Jenny

Monday, January 9, 2012

TUTORIAL: How to hem jeans

Have you ever tried on a great fitting pair of jeans only to look down and see they are WAY TOO long? This happens to me all the time since I am petite. I used to shy away from long jeans and would simply keep looking for another pair, figuring I would wear boots all the time to give me a boost and not have to hem them. Well of course that only works for so long, right? Nowadays with skinny jeans being so "in" I had no choice but to face my fear and figure out how to alter jeans. Believe me, once you cut into your first pair and alter them yourself, there's no going back! You won't need to get them professionally altered, rather, you can do it yourself every time!

Here goes!! Don't be afraid to cut your jeans, girls!

Tutorial:
How to hem your jeans


Gather materials:
*Jeans that need altering / hemming
*Pins
*Scissors
*Denim needle for your sewing machine (or a size 90/size 14 needle...see below)
*straight edge ruler
*thread (I usually go with a goldish color)

1. Figure out how much shorter your jeans need to be and subtract 1 from that.
*These jeans needed to be 2 inches shorter, so 2-1 = 1 inch.

2. Using your straight edge draw your cutting line at this new number. (I am drawing my line at 1 inch.)
I always use a sharpie.


3. See the line? Repeat for the other jean leg.

4. Cut along the lines - don't be scared, just do it!!
I figure I won't wear these jeans as long as they are now anyway, and definitely won't roll them!
So what have I got to lose?
**Save one of these pieces to test your needle and thread tension in a few steps.

5. Fold up a 1 inch hem and press with an iron. Do not pin yet.

6. Take the top (cut end) of the jeans and gently fold it down with your fingers to meet the fold you just pressed with an iron. This will give you a 1/2 inch folded hem.

7. Continue and pin all around. Repeat for other leg.

8. Insert your denim needle (or larger sized needle since denim is thick).

9. Test your bobbin and thread tension on the scrap you saved. Sew on it in a straight line.
Play around on the scrap until you feel comfortable with the tension and stitch length. I use a 3.0 stitch length.


10. Sew along the pinned edge and remove the pins as you sew. Use a 1/2 inch seam allowance, or simply stay as close to the folded edge as you can. Repeat for both jean legs.


 HINT: when you come to your side seams you want to keep your presser foot flat as it sews. If it tilts up and then down your stitches will not be even. I just lift the jean material behind the presser foot as it goes over the "bump" of the side seam. This keeps it flat on the material and it keeps sewing smoothly.

You did it! They may not be perfect the first time, but you definitely won't be stepping on them anymore!
Go sport your new jeans and don't be afraid of long jeans ever again!! You can hem your jeans!

Enjoy and Happy Sewing!
~Jenny

Wednesday, January 4, 2012

Tutorial: How to sew a pillow

Even if you are a true beginner sewer, you CAN sew a pillow!

If you know how to thread your machine and bobbin and sew a straight stitch you have all the skills you need to sew a pillow! In fact, when I started sewing my very first projects were making pillows for my couch. My husband and I lived in a tiny apartment and were on an even tinier budget. But the wonderful thing about making pillows is it does not take much fabric but makes a huge impact on your home decor. You can take a very bland couch and spruce it up with some throw pillows in a day! It takes about 30 minutes max to make one pillow if you are a true beginner and after making a few you can whip them up in no time!


Ready to learn?

Tutorial: How to sew a pillow

1. Gather materials: a 12 x 18 inch pillow insert, scissors, straight edge/ruler, pins, 5/8 a yard fabric
************************************************************************
Helpful Hints:
*Since home decor fabric is 60 inches wide you can actually make 3 pillows this size with the fabric.
*You can also use poly fill. Get 1 bag to make one pillow this size.
*If you are on a budget start by looking in the clearance section for fabric. Usually at Hancock's fabric I can find a yard of home decor fabric for $5 or LESS when it's on sale! Think if you are only using 5/8 of a yard and the yard of fabric is $5.00 then you will only spend around $3.25 for the fabric for 3 pillows!! Score!
*If you want to cover a pillow form you can also check the clearance section at a store such as TJ Maxx, Marshalls or Homegoods for throw pillows. Your measurements will be specific to those pillows, but no worries! Just figure out the pillow's size and add 1 inch around all sides to get your measurements. Cut your fabric and begin!

***********************************************************************

2. Cut 2 pieces of fabric 14 inches x 20 inches. One piece is for the front and one piece is for the back.
 This leaves you a one inch seam allowance on all sides.

3. Lay them right sides together and pin around all 4 sides. 

4. Starting at the top right corner, measure 4 inches to the left and place 2 pins.
Repeat for the left corner.
(*You will leave the space between the 2 sets of pins unsewn. This leaves an opening for turning it right side out and for inserting your pillow form later.)


5. Using a 1 inch seam allowance start sewing at the 2 pins on the top right. Sew towards the nearest corner, down the short edge, across the bottom, up the opposite side and across the top but STOP sewing when you reach the other set of 2 pins.
*Remove pins as you sew.


6. Clip your corners. I cut off the corner of the pillow and clip up to the sewn line, but not through it. This will ease the tension in the fabric to allow for neater corners when you turn it inside out. It will reduce the bulk of the fabric which will also make it easier for turning.

7. Turn inside out. Press with an iron.
Use a turning tool for the corners if needed.

8. Insert your pillow form (or fill with poly fill).

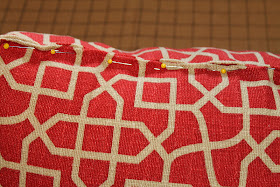
9. Pin the opening closed. Turn the fabric down with your fingers carefully so the edges match up nicely.

10. Hand-sew the opening closed.
You're DONE!!

Toss that pillow on a couch, bed or chair and be proud of what you made!

Then make another one with the leftover fabric! And you will smile everytime you walk into the room and see the pillows that YOU made!!

*Coming soon: Envelope Pillow Tutorial
(I love these because there isn't any hand sewing!)

Happy Sewing!
Jenny