Pages

Friday, December 30, 2011

How to recover a chair - TUTORIAL and a WINNER

Giveaway! Enter to win a CLUTCH (made by me!). CLICK HERE to enter.
WINNER of $25 gift card to Stella Bella Designs is: Tanya of Sew Many Dreams
*****************************************************************************
Chair Makeover
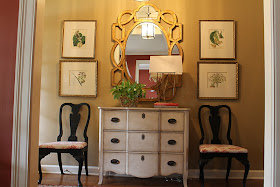
Recovering a dining room chair can be easy! I've had these two black chairs for about 8 years and they've been covered in this red toile fabric. These chairs have moved around in our house since I love their shape, they aren't too wide or deep and I think the black really makes them stand out against the wall. They have been in our kitchen at the table, on either side of a china hutch, in our den on either side of a console table against the wall and now sit in our foyer/entryway. The red toile fabric just didn't have enough pop to go with the furniture, rug and art, so it was time for a change.

Tutorial:  Recovering a chair cushion
BEFORE picture

 AFTER picture


1. Gather supplies:
*7/8 yard fabric (home decor fabric, 60 inches wide) will recover 2 chair seats
*staple gun
*screwdriver (if you have an electric one, time to use it!)
*batting or poly-fill (batting is what you are supposed to use but I didn't have any)

2. Turn the chair on it's side. There are 4 screws holding on the seat - unscrew them.

3. Lay your seats on the fabric. Think about what part of the fabric design you want in the center of the seat. Cut up the middle of the two seats so you have two pieces of fabric.

*Cut a few layers of batting the shape of the top of the seat.
Lay it down on the fabric, then place the cushion on top.
(I skipped the batting and used poly-fill a few steps later...you will see it below.)

4. Pull up the bottom and staple. Pull up the corners and staple.
Repeat for 3 sides only. **Leave one side open!


5. I left one side open so I could stuff it full of poly-fill. Make sure you get all the corners and crevices. 
(*I used poly-fill because I had it on hand...use batting if you have it.) 

6. Flip it over and check out your work!

7. Repeat for the other cushion.

8. Screw the seats back on the chairs.


Enjoy the new look!

Wednesday, December 28, 2011

Tutorial: How to sew a child's apron

Enter to win a free CLUTCH (made by me!). CLICK HERE to enter.
Enter to win $25 store credit to Stella Belle Designs. CLICK HERE to enter.

Sew and Tell....It's a Dollar Store Craft!

Last week my sister and I were browsing a craft market and saw a lady selling potholder aprons. She made them using Christmas dishtowels and Christmas potholders and was selling them for $10 each. Immediately my sewing brain kicked in and I thought...I can make it for $1!
So, here it is...enjoy!

Tutorial:
Potholder Apron Tutorial

What's the secret to some good cooking?
Cute aprons of course!

1. Gather supplies. (These supplies will make you 2 aprons!)

dollar store items: package of potholders (came in a set of 2), package of dishtowels (came in a set of 2)
ribbons, trims, fabric for a ruffle (all optional)

2. Cut dishtowel in half widthwise.

3. Cut a strip of fabric 6 inches x 44 inches (or shorter depending on how ruffled you like it)

4. Iron your ruffle in half with raw edges and right side facing up.

5. Gather and pin your ruffle. I just do this by pinning the left end, the right end and the middle. Then I continue finding and pinning the middle of each section.

6. Sew on using a 1/2 inch seam allowance.

7. Fold ruffle down and press with an iron.

8. Use a decorative stitch or a straight stitch and topstitch. This holds your ruffle in place.
I chose stitch #16...see below.


9. Lay out your top ribbon and leave 12 inches hanging off each end and pin.
10. Lay out your other ribbon and leave one inch hanging off the end and pin.
11. Sew on your ribbons. Fold back the edges of your ribbon that had one inch hanging over the end to give it a tidy look. Leave the 12 inches on either side since these will be your straps.

12. Cut out a scrap to be your applique. My fabric had a cupcake on it so there wasn't any tedious cutting of different colors of fabric.

13. Sew around your shape using a zig-zag stitch.

14. Cut a piece of ribbon 24 inches long and loop through the potholder loop. Tie a knot to secure.

Try it on your little girl or give it as a gift!


This cupcake cutie is having a ball!

My little boy had to join in the fun wearing his crab apron (and Woody hat, of course!).

Cooking together in their new playhouse. Sweet memories!! Gosh, I wish they didn't grow so quickly!!

"Cheese!"
Why is it that spatulas are amazingly fun to kids??

Reaching for the stars and ready to cook!

I hope you all think about making an apron next time you see a potholder!

Enjoy and Happy Sewing!
~Jenny

Tuesday, December 27, 2011

Tutorial: How to sew a CLUTCH!...or WIN IT!

Have you been thinking about New Year's Eve yet and what you are going to wear? This year don't worry about your accessories, make yourself a CLUTCH! (Don't be scared...it only takes 20 minutes!)

*Want to WIN this CLUTCH? Enter below!!

The Party Girl Clutch
Tutorial


Materials needed:

2 different fabrics ( each 16 inches long x 11 inches wide)
an inch of velcro
material to embellish

1. Cut your main fabric piece to 16 in x 11 in
and
Cut your lining piece to 16 in x 11 in

(You can add medium weight interfacing at this point. Iron it on the WRONG side of one of your fabrics then continue with step 2. I used a denim fabric as the lining so I chose not to for this clutch.)

2. Place your pieces right sides together. Pin around all four sides.
 
3. Starting at one short side, sew all the way around your clutch but STOPPING 5 inches before your starting point. This is how you will turn it right side out and you will close the hole later.

4. Turn the piece right side out.

5. Press with an iron. Fold in the hole that was used for turning, press with an iron and pin. 

6. Sew along the entire side that had the hole using a 1/8 inch seam allowance (or as close to the edge as possible).

7. Lay your clutch right side down with the bottom being the side you just sewed.
Fold up the bottom 6 inches and pin along the left and right sides.

8. Sew up one side, across the top and down the opposite side. Do not sew along the bottom.


9. Attach a piece of velcro (remove the paper backing and stick on your clutch).

10. Sew on your velcro. (You can sew around all 4 edges.)

11. Embellish.

You're done!!
Wear it out and show it off!

Want to WIN this clutch?
 ** Leave a comment for each you do.
Each comment is ONE entry.

1. Follow Seamingly Smitten blog.
2. Like Seamingly Smitten on Facebook (click here).
3. Post about this giveaway on your blog. (Leave the link!)
4. Tweet about this giveaway.

Winner will be announced Friday, January 6th, 2012 and notified via email!
Happy New Year!

Friday, December 23, 2011

Tutorial: Firewood Holder - Make it in 20 minutes!

Today you will find me HERE at the blog Johnny in a Dress.
I will show you how to make a firewood holder (great Christmas gift for a man in your life!) in under 20 minutes and it only cost FIVE DOLLARS!

Head on over and check it out!

Monday, December 19, 2011

WINNERS!

It is time to announce the winners of all the fantastic giveaways we had for our blogging event - Sew Crafty Christmas! Congratulations to ALL OF YOU!!! A huge THANK YOU also goes out to all the AMAZING SPONSORS and GUEST POSTERS!!!

I hope you learned something, sewed something, or were simply inspired to create!


Here are the giveaways and the winners! So Sew Giveaway - winner is twelve30

Underwood Illustration notecards giveaway - winner is Hueisei

Sew Adorable Too Boutique giveaway - winner is Natalie from Johnny in a Dress

Village Needler Giveaway - winner is Jen - Craftin Cowgirl Blog

Seamingly Smitten giveaway - winner is Deloris

PB3J boutique giveaway - winner is David

Byrdlegs Boutique - winner is Katrina


To the winners, you will be contacted soon by the shop/boutique's owner. I hope you enjoy your gift! Thanks for reading along and I hope you have a Sew Crafty Christmas!

Merry Christmas everyone!Jenny


Sunday, December 18, 2011

TUTORIAL: Fabric covered Christmas trees with Kelli from Small Town Stitcher sewing blog

Today's guest poster is Kelli from Small Town Stitcher blog!
If you are a quilter, a mom, or even a crafter, you will LOVE her blog!
Kelli has posted a few times before on Seamingly Smitten and showed off her AMAZING sewing skills!


Kelli made this shirt from a skirt. CLICK HERE for tutorial

Her Anthropology inspired Grommet Skirt...CLICK HERE for the tutorial


Kelli is also a quilter. I LOVE this one for Christmas time!  CLICK HERE to read about it!

Take it away, Kelli!

Hi everyone!  I'm so excited to be here with you today.  My name is Kelli and I blog over at Small Town Stitcher.  I met Jenny a year or so ago through a link up party we'd both entered.  I loved her project and commented and we struck up a conversation and then a friendship. I am always amazed at what she creates to wear and to dress her kiddos in.  We make a good pair, because Jenny is so good at creating patterns, and I'm so good at following them!  ;)  I've tried many of her patterns and they're all great.

When she asked me to be a part of her Sew Crafty Christmas event I thought I'd show y'all a craft I do with my children every year at Christmas.  It's easy and there are about a million different tutorials for versions of this on the web.  But, I'm going to show you this most basic version and you can take it from there.  My kids are 5 and 7 and we've been doing this together for a few years.  Emma, my 7-year-old can pretty much do it on her own now, but Oren, my 5-year-old still needed guidance. So it is definitely a craft you and your kids can grow into and make a tradition.

We're going to make some fabric-covered Christmas trees!
 

You'll need styrofoam cones (of any size, we like to mix it up), fabric cut into small squares and rectangles (I just hack away...bigger shapes fill the tree faster, little ones give you more control), decoupage glue (we use Mod-Podge mixed with some water) and a paint brush.  I'd also recommend some newspaper so you don't glue the trees to your table, but that's up to you.  ;)

And here we go:

1.  Lay out all of your supplies and start gluing.  I usually put a little glue on the tree, stick the piece of fabric down and then dab a little glue right over the fabric.  Then you can just overlap pieces until the tree is covered!


This little tree is in progress.  See how you just glue down the pieces on top of each other?   That way you make sure to cover everywhere.
2.  Now for that pesky top...there are two ways to conquer this.  You can start here so that the folded-over edges will be covered, but it can be tricky for little fingers to keep the edges smooth, or you can end with the top piece.  I've done both.  For these trees, I glued down the top for them.  The key is to make snips along the fabric that overhangs the top flat area.  Then these snipped pieces can be folded over and arranged to lay flatter.

Here I started with the top and glued it down well before going down the sides.

3.  What I love about this craft is that it doesn't require perfection.  This is a craft you are making with your kids and (from a distance at least!) they'll look just as good if they're perfectly flat or a little bumpy.  Now, if you're a perfectionist, you can certainly make these yourself and they'll look great.  In our little "forest" there are some I've made with the kids and some I've made alone.  I choose to let the happy memories of time spent together haze out all of those bumpy-edged trees from years past.  :)


4.  But fabric is not your only medium to work with.  We've also made yarn-covered trees


and tissue-paper trees.


And really, the sky is the limit here.  I've seen these trees made with ruffled fabric, scrunched up balls of tissue paper, sequins, etc.  You could use newspaper or sheet music for a vintage look.  You could use pins with jeweled heads or beads to be ornaments on your trees.  I mean, what I'm showing you is just the first step...where you go from here can be all you!

Thanks again to Jenny for letting me come over and hang out today!  I wish each of you the very Merriest Christmas and a happy heart this holiday season.  Now get to gluing you up some Christmas trees and start your own Christmas forest filled with memories of time spent together!!


P.S.  I've got a giveaway going on the blog this week, so stop by and enter to win a fun prize!